Using Let’s Encrypt SSL Certificates
This page covers how to configure your web server to use Let’s Encrypt as the certificate authority for your ownCloud server. Note that Let’s Encrypt is not officially supported, and this page is community-maintained. Thank you, contributors!
- For ease of handling, SSL-specific directives have been moved into a separately included file. This can help for first-time certificate issuance as well as for reusing configurations.
- The examples shown are based on Ubuntu 17.10.
- Read the Certbot user guide for details of the commands.
- Let’s Encrypt CA issues short-lived certificates valid for 90 days. Make sure you renew the certificates at least once in this period, because expired certificates need reissuing. A certificate is due for renewal earliest 30 days before expiring. Certbot can be forced to renew via options at any time as long the certificate is valid.
Excellent introductions to strong SSL security measures can be found here: Apache and NGINX.
- Requirements & Dependencies
- Install Let’s Encrypt’s Certbot client
- Register your email address
- Create Let’s Encrypt’s config files
- Create an SSL certificate
- Web Server setup
- Test the setup
- `Certificate renewal`_
Requirements & Dependencies
- You require a domain name with a valid A record pointing back to your servers IP address. In case your server is behind a firewall, take the necessary measures to ensure that your server is accessible, worldwide, from the internet, by adding the required firewall and port forward rules.
Install Let’s Encrypt’s Certbot client
The latest Certbot client can be installed in two ways:
- From source.
- With the Ubuntu ppa repository.
Via GitHub
sudo apt-get update
sudo apt-get install -y git
sudo git clone https://github.com/certbot/certbot /opt/letsencrypt
To run Certbot use the following command:
sudo /opt/letsencrypt/certbot-auto
Note
For the sake of simplicity, the path chosen for the installation is /opt/letsencrypt.
You can use any path that fits your needs.
Note
Unless explicitly denied, Certbot will auto-update on each run.
As part of the first run, certbot-auto will install any missing dependencies.
Via Apt
To install Certbot via the PPA repository, run the following commands. These will add the repository, update Apt’s cache, and install Certbot.
sudo apt-get install certbot
Note
If you’re using a version of Ubuntu prior to 17.10, you may need to run the following commands before you can install Certbot:
sudo apt-get update
sudo apt-get install software-properties-common
sudo add-apt-repository ppa:certbot/certbot
To run Certbot use the following command:
sudo /usr/bin/certbot

# Alternatively, you could run the following instead
sudo certbot
Note
Depending on how you installed Let’s Encrypt, certbot may also be named letsencrypt or certbot-auto.
However, this guide will refer to it as certbot.
Please bear that in mind, and update the ../examples and scripts used in this guide to reflect your Certbot installation.
Updating Certbot
If you need to update Certbot at a later date, run sudo apt-get install --only-upgrade certbot.
Register your email address
Now that Certbot is installed, register your email address for urgent renewal and security notifications. This command also prepares Certbot’s environment if it’s not already installed. To do this, run the following command:
sudo certbot register --agree-tos --email <your-email-address>
When it executes, you’ll see the following question, which you can answer “Yes” or “No” to:
Saving debug log to /var/log/letsencrypt/letsencrypt.log
-------------------------------------------------------------------------------
Would you be willing to share your email address with the Electronic Frontier
Foundation, a founding partner of the Let's Encrypt project and the non-profit
organization that develops Certbot? We'd like to send you email about EFF and
our work to encrypt the web, protect its users and defend digital rights.
-------------------------------------------------------------------------------
(Y)es/(N)o:
When that completes, you’ll see a message similar to the following:
IMPORTANT NOTES:
 1. Your account credentials have been saved in your Certbot
    configuration directory at /etc/letsencrypt. You should make a
    secure backup of this folder now. This configuration directory will
    also contain certificates and private keys obtained by Certbot so
    making regular backups of this folder is ideal.
Please, strongly, consider following its recommendation.
Create Let’s Encrypt’s config files
- Create following files in the Let’s Encrypt directory. They will help to maintain your certificates.
- Replace the path to Certbot and the Certbot script name based on your installation. You can find it by running
which certbot. - Rename <your-domain-name>.sh with the name of the domain(s) you want to issue a certificate for. As an example, the script could be renamed to
your-domain-name.com.sh. - Make all files executable except
cli.iniby runningsudo chmod +x <script-name>.
Note
All scripts have to be executed with sudo.
cd /etc/letsencrypt
touch cli.ini list.sh renew.sh renew-cron.sh delete.sh <your-domain-name>.sh
cli.ini
This file defines some settings used by Certbot. Use the email address you registered with. Comment / un-comment the post-hook parameter according which web server you use.
rsa-key-size = 4096
email = <your-email-address>
agree-tos = True
authenticator = webroot
webroot-path = /var/www/letsencrypt/
post-hook = service nginx reload
# post-hook = service apache2 reload
list.sh
This script lists all your issued certificates.
#!/bin/bash

LE_PATH="/usr/bin"
LE_CB="certbot"

"$LE_PATH/$LE_CB" certificates
renew.sh
This script:
- Renews all your issued certificates.
- Updates Certbot, when using Git as the installation source.
- Reloads the web server configuration automatically if a certificate has been renewed.
#!/bin/bash

LE_PATH="/usr/bin"
LE_CB="certbot"

"$LE_PATH/$LE_CB" renew
renew-cron.sh
This script:
- Renews all your issued certificates but does not upgrade Certbot.
- Reloads the web server configuration automatically if a certificate has been renewed.
Note
It is intended for use via Cron.
#!/bin/bash

LE_PATH="/usr/bin"
LE_CB="certbot"

"$LE_PATH/$LE_CB" renew --no-self-upgrade --noninteractive
delete.sh
This script deletes an issued certificate.
Use the list.sh script to list issued certificates.
#!/bin/bash

LE_PATH="/usr/bin"
LE_CB="certbot"

##
## Retrieve and print a list of the installed Let's Encrypt SSL certificates.
##
function get_certificate_names()
{
  "$LE_PATH/$LE_CB" certificates | grep -iE "certificate name" | awk -F: '{gsub(/\s+/, "", $2); printf("- %s\n", $2)}'
}

echo "Available Certificates:"

get_certificate_names
echo

read -p "Which certificate do you want to delete: " -r -e answer
if [ -n "$answer" ]; then
  "$LE_PATH/$LE_CB" delete --cert-name "$answer"
fi
<your-domain-name>.sh
As an example, this script creates a certificate for following domain / sub-domains. You can add or remove sub-domains as necessary. Use your domain / sub-domain names. The first (sub)domain name used in the script is taken for naming the directories created by Certbot.
Note: You can create different certificates for different sub-domains, such as mydom.tld, www.mydom.tld, and sub.mydom.tld, by creating different scripts.
You can see an example script here below:
#!/bin/bash
# export makes the variable available for all subprocesses

LE_PATH="/usr/bin"
LE_CB="certbot"

# Assumes that mydom.tld www.mydom.tld and sub.mydom.tld are the domains that you want a certificate for
export DOMAINS="-d mydom.tld -d www.mydom.tld -d sub.mydom.tld"

"$LE_PATH/$LE_CB" certonly --config /etc/letsencrypt/cli.ini "$DOMAINS" # --dry-run
Note
You can enable the --dry-run option which does a test run of the client only.
Create an SSL certificate
With all the scripts created, to create an SSL certificate, run the following command:
sudo /etc/letsencrypt/<your-domain-name>.sh
After you run the script, you will see output similar to the following:
Saving debug log to /var/log/letsencrypt/letsencrypt.log
Obtaining a new certificate
Performing the following challenges:
http-01 challenge for your-domain-name.com
Using the webroot path /var/www/html for all unmatched domains.
Waiting for verification...
Cleaning up challenges
Running post-hook command: service apache2 reload

IMPORTANT NOTES:
 1. Congratulations! Your certificate and chain have been saved at:
    /etc/letsencrypt/live/your-domain-name.com/fullchain.pem
    Your key file has been saved at:
    /etc/letsencrypt/live/your-domain-name.com/privkey.pem
    Your cert will expire on 2018-06-18. To obtain a new or tweaked
    version of this certificate in the future, simply run certbot
    again. To non-interactively renew *all* of your certificates, run
    "certbot renew"
 2. If you like Certbot, please consider supporting our work by:

    Donating to ISRG / Let's Encrypt:   https://letsencrypt.org/donate
    Donating to EFF:                    https://eff.org/donate-le
You can see that the SSL certificate’s been successfully created, and that it will expire on 2018-06-18.
Listing Existing Certificates
If you want to list (view) the existing SSL certificates, use list.sh, which can be run as follows:
sudo /etc/letsencrypt/list.sh
Depending on the number of certificates, you can expect to see output similar to the following:
-------------------------------------------------------------------------------
Found the following certs:
  Certificate Name: your-domain-name.com
    Domains: your-domain-name.com
    Expiry Date: 2018-06-18 10:57:18+00:00 (VALID: 82 days)
    Certificate Path: /etc/letsencrypt/live/your-domain-name.com/fullchain.pem
    Private Key Path: /etc/letsencrypt/live/your-domain-name.com/privkey.pem
-------------------------------------------------------------------------------
Web Server setup
Follow the links to set up your web server and issue a certificate.
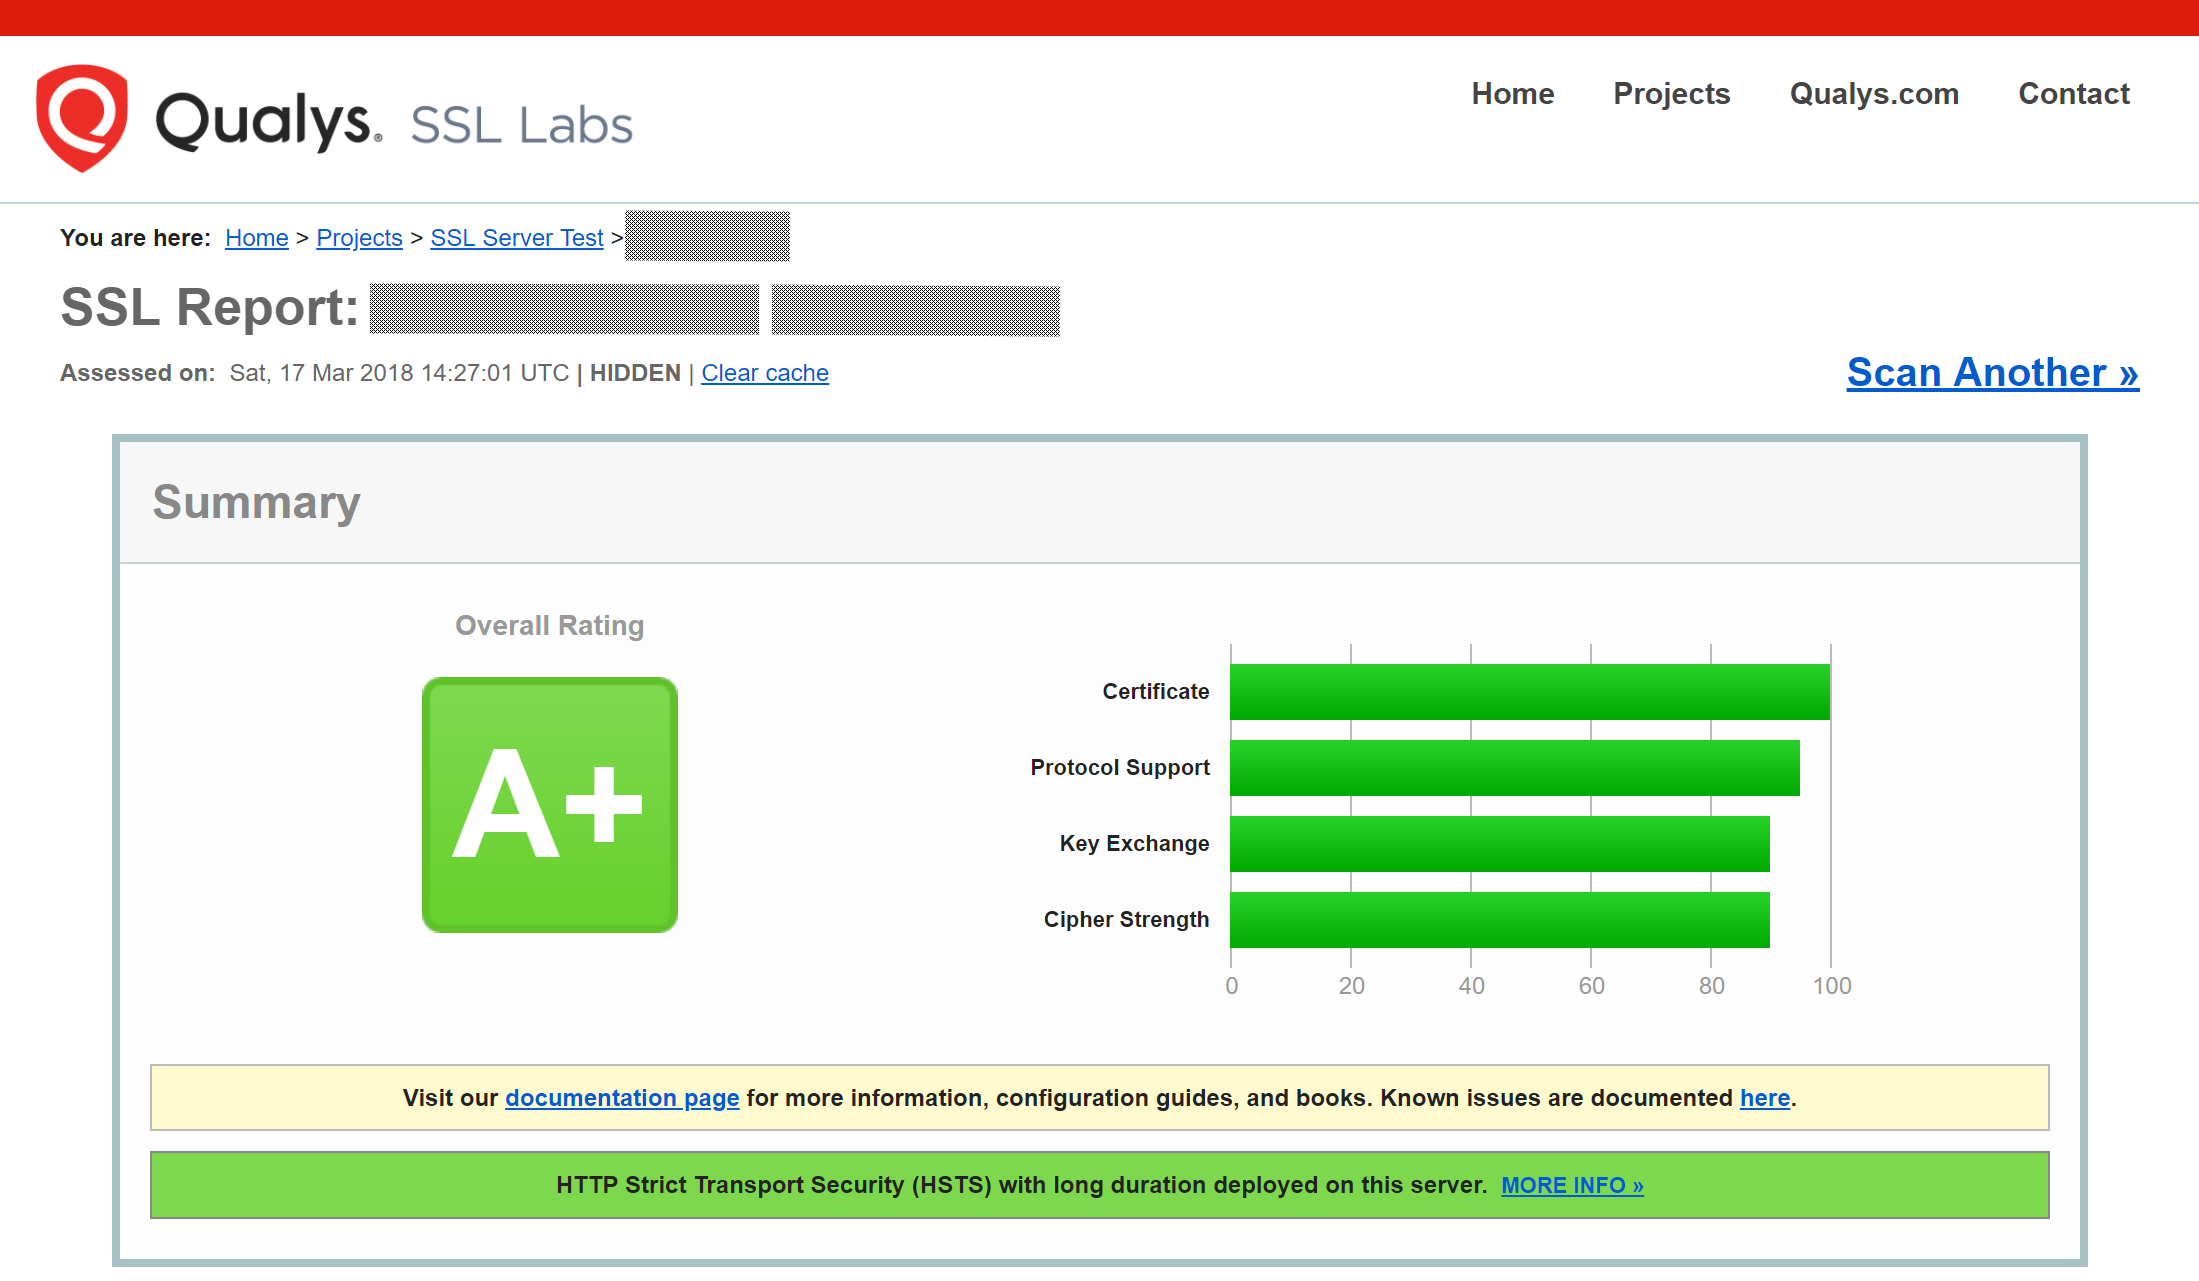
Test the setup
After you have setup and configured the web server and installed the SSL certificate using Certbot, you should now test the security of your new configuration. To do so, you can use the free service of SSL Labs. See an example screenshot of a test run below.
Renewing Certificates
As Let’s Encrypts certificates expire every 90 days, you should ensure you renew them before that time. There are two ways to do so: manually and automatically.
Manual renewal
If you have provided your email address, you will receive reminder notifications.
sudo /etc/letsencrypt/renew.sh
If the certificate is not yet due for renewal, you can expect to see output similar to that below:
-------------------------------------------------------------------------------
Processing /etc/letsencrypt/renewal/your-domain-name.com.conf
-------------------------------------------------------------------------------
Cert not yet due for renewal

The following certs are not due for renewal yet:
  /etc/letsencrypt/live/your-domain-name.com/fullchain.pem (skipped)
No renewals were attempted.
No hooks were run.
Automatic renewal via crontab
Certificates are only renewed if they are due, so you can schedule Cron jobs to renew your SSL certificates on a more frequent basis. However, a weekly check is sufficient.
To add a new Cron job to auto-renew your certificates, firstly run the following command to edit the job list.
sudo crontab -e
Note
It is essential to use sudo to derive proper permissions.
Then, add the following at the end of the existing configuration:
30 03 * * 6 /etc/letsencrypt/renew-cron.sh
After you save and exit the file, the new job will have been added to the Cron job scheduler.
Note
If you want to use own values, you can check them at crontab.guru or modify the script for other options.
Add extra domains to the certificate
If you want to add an extra domain, like test.mydom.tld, to your certificate, add the domain in the domain shell script above, re-run it and reload the web server config.
This can be useful when migrating from a sub-directory to sub-domain access.
Note
This also implies that you need to comment the include directive (please refer to the relevant web server setup) and follow the steps afterward.
Deleting SSL Certificates
If you want to delete an SSL certificate, use the delete.sh script, running it as follows:
sudo /etc/letsencrypt/delete.sh
It will start off, as below, by displaying a list of the currently available SSL certificate domain names, and then prompt you to supply the certificate that you want to delete.
Available Certificates:

1. your-domain-name.com

Which certificate do you want to delete:
Provide the SSL certificate name that you want to delete and click enter, and the certificate and all of its related files will be deleted. After that you should expect to see a confirmation, as in the example output below.
-------------------------------------------------------------------------------
Deleted all files relating to certificate your-domain-name.com.
-------------------------------------------------------------------------------